
For e-commerce enthusiasts and savvy entrepreneurs, WordPress stands as the top choice for constructing their online empires. A staggering 43% of websites worldwide are powered by this dynamic platform, a number that continues to surge. Right here, on this very blog, WordPress works its magic, and if you’re reading this guide, chances are your website is already a part of the WordPress family or soon will be.
Why the fervor for WordPress in the e-commerce and business realms? One of the main attractions lies in its user-friendliness, making maintenance of such a site a breeze even for those who shy away from coding. In line with that, the process of migrating your WordPress website can be just as swift and hassle-free.
Whether you’re running a WooCommerce store, managing a personal website, or curating a blog, you can effortlessly achieve WordPress website migration without breaking a sweat with the assistance of the trusty plugin known as Backup Migration.
We handpicked this gem of a plugin because of its intuitive interface, which empowers users to execute backups and migrations with just a few simple steps. It’s ready to roll right out of the box, with most scenarios requiring no additional tinkering.
The entire process neatly breaks down into two parts: the first step involves creating backups (a practice you should embrace regularly, by the way), and the second entails the actual migration. It’s that straightforward.
Backup process
The first part of the process is the backup creation, and it is a quicker one. Here’s how you do it:
- Begin by installing the Backup Migration plugin on your source site. This can be swiftly achieved via the WordPress Dashboard, or you can opt for a manual download and installation from the WordPress plugin directory: https://wordpress.org/plugins/backup-backup/.
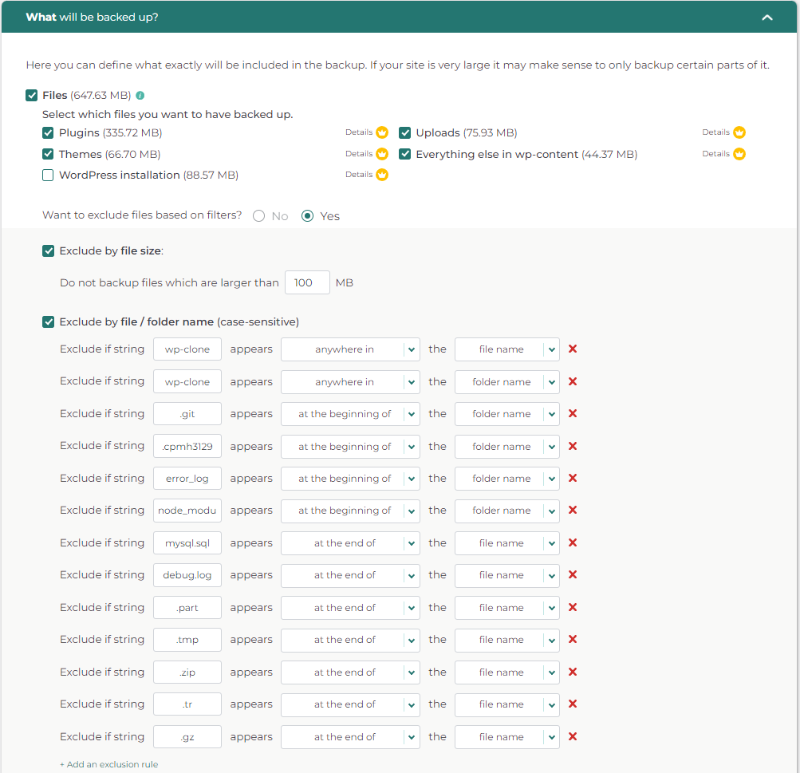
- Once the plugin is activated on your website, it will guide you seamlessly to its dedicated menu page within the WordPress Dashboard. Navigate to the “What will be backed up?” section and make the wise choice of selecting all plugins, themes, files, folders, and databases without exceptions, then hit the “Save” button. This ensures a complete site backup.
- A single click on the “Create backup now!” button, and the plugin springs into action, wrapping up the backup process in a mere minute or two for smaller sites, contingent on your database size and server setup. For larger websites exceeding 2GB, you might consider the premium Backup Migration plugin. Upon backup completion, don’t forget the best practice of downloading the backup file, thus keeping a safe local copy.

Migration process
The second act, the migration process, takes center stage on the destination site, which you need to set up initially. Thankfully, most WordPress hosting providers now offer an effortless WordPress instance launch feature. But even if your hosting isn’t as fancy, setting up a fresh WordPress site is still a quick task.
Follow these steps on the destination site:
- Just as on the source site, install the Backup Migration plugin the same way, thus laying a foundation for your new website.
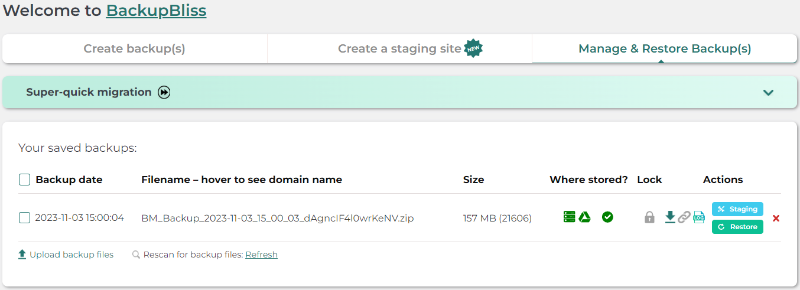
- Once the plugin is in place, make your way to the “Manage & Restore Backup(s)” section. There, you’ll find three restoration options, designed to fit your unique scenario:
I. Super-quick migration: If you’re shifting to a new domain, this is your go-to. Simply paste the backup file’s link from the source site and click the “Restore now!” button. Backup file links can be conveniently obtained from the same plugin section, marked with a small link icon.
II. Upload backup files: In this path, you can manually upload backup zip files. Take your pick between selecting the file or using the drag-and-drop method. Once your backup file is uploaded to the website, initiate the restoration by clicking the “Restore” button, located right beside your listed backup file.
III. External storage: Choose this option to keep your backups safely stored on the cloud. Google Drive is ready for action, with more options on the horizon. Connect your Google account in the Backup Migration plugin’s “Where shall the backup(s) be stored?” section, and sync your backup files across your online ventures. Click “Restore” when you’re ready to revive your site in the “Manage & Restore Backups” section.
With these steps wrapped up, your migration journey is complete, and your source site has found its new home. For those who want to maintain access to the old site, setting up proper redirects from the old domain to the new one is advisable. Thankfully, the user-friendly Redirection plugin, also crafted by the Inisev team, is here to assist, offering a familiar interface for swift and efficient setup of redirections.
Enhancing Your Website Backup and Migration Experience
As you start the practice of creating backups and migrating your website, there are several key considerations to ensure a seamless and efficient process. Let’s dive into these crucial aspects:
Streamlining Large Files
Throughout the life of your WordPress site, it’s common for an abundance of files and folders to accumulate, some of which may be outdated or simply forgotten. While regular website cleanup may often be overlooked, a site migration offers the perfect opportunity to declutter your digital space. To achieve this, the Backup Migration plugin provides an incredibly convenient solution through “Exclusion rules”, which we touched upon in Step 2 earlier.
Straight out of the box, the Backup Migration plugin comes equipped with preset exclusion rules, specifically designed to exclude files exceeding 100MB in size – often remnants of old backup files. Another example of these bulky, unnecessary files could be poorly compressed videos that have long since slipped from memory. Of course, there could be various other instances as well.
For those concerned about accidentally leaving out essential files, fear not! The plugin meticulously keeps a comprehensive log of the excluded files during the backup creation process. This means you can monitor exactly which files are being excluded. If, by chance, there are still large files actively in use on your site, you have the option to manually relocate them, significantly expediting the backup process. Alternatively, if you’re aware of specific large files on your site, you can opt to exclude them directly based on file path, file name, or a unique string within the file name.
Taming Enormous Databases
While large media files such as videos, images, or audio might bulk up your website’s overall size and backup file, they typically don’t pose a significant challenge during the backup process. However, managing substantial databases is an entirely different ballgame and may require some extra care during website migrations. Fortunately, the developers behind the Backup Migration plugin have incorporated advanced features to tackle this specific issue, ensuring a smooth backup and migration process, even on slower servers. Indeed, many websites migrate because they have outgrown their current hosting servers or plans.
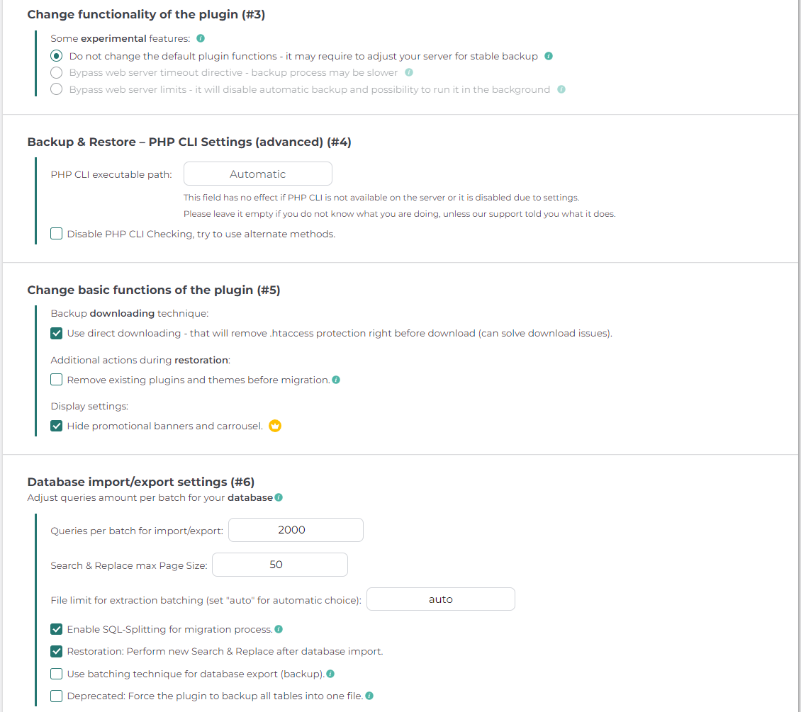
You’ll find database-related settings in the Backup Migration plugin under “Other Options”. In cases where your database is particularly hefty, you should adjust these settings accordingly:
- Consider bypassing server limits (options 2 or 3).
- Disable PHP CLI checking and utilize alternative methods.
- Set the number of database queries per batch to 100.
- Enable SQL-Splitting for a more streamlined experience.
Ensuring Ongoing Backup Success
Once your migration is complete, the journey doesn’t end there. Keeping your WordPress site safe and sound is an ongoing responsibility. One of the essentials here is regular automated backups. These can be a lifesaver in case of unforeseen website mishaps, allowing you to restore your site to its former glory swiftly, sparing you precious time and resources, and keeping stress at bay.
The Backup Migration plugin empowers users to set up automatic backups at intervals that suit them best, ensuring minimal disruption to website traffic. You can also specify the number of backups to retain, automatically replacing older ones and preventing unnecessary space consumption.
Incorporating these strategies and the power of the Backup Migration plugin into your backup and migration process will help safeguard your website’s integrity and streamline your journey toward a more efficient and stress-free web management experience.
Alternative ways to run the WordPress migration process
While we’ve diligently walked you through a comprehensive step-by-step migration process, we understand that the vast landscape of over 800 million WordPress websites in 2023 means no one-size-fits-all solution. The uniqueness of each website, coupled with the myriad hosting options and the varied preferences of site owners, necessitates flexibility in approach.
Acknowledging this diversity, we’re here to introduce a couple of alternative migration solutions. These options cater to different needs, ensuring you find the perfect fit for your specific circumstances, whether it be your hosting provider, website setup, or personal preferences. After all, with thousands of hostings, website setups, and site owners, having choices is the key to a successful migration journey. Let’s explore these alternatives to empower you with the flexibility you need for a seamless and tailored migration experience.
Manual WordPress migration
In contrast to the plugin-powered migration journey, this alternative approach takes a hands-on route, bypassing third-party tools and putting the control firmly in the hands of the site owner or webmaster. It is desirable to have some basic knowledge of specific hosting in use, and most common management panels like PHPMyAdmin or cPanel, and the FTP client.
This migration process basically also has two major chapters: export and import of the website, though, contrary to migration with the plugin, a database is something that gives an extra dimension here. Unlike files and folders, it cannot be simply copy-pasted and expected to work. It requires precise manual work, that is otherwise done completely automatically with the Backup Migration plugin process.
Here are the steps for the first chapter, the Export:
- Note down critical website information: database credentials (username, password, host, database name); WordPress admin credentials; server details for both old and new hosts.
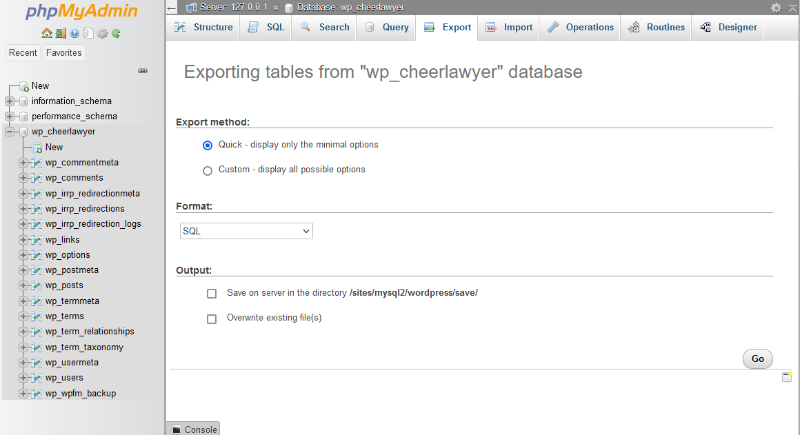
- On the old hosting, using PHPMyAdmin, the steps to export the database are like this:
– Log in and choose the database you want to download.
– Go to the Export tab and, with the Quick export method enabled, click Export at the bottom. Export the entire database as a .sql file. Downloading the website database might take some time. - Connect to your old server using an FTP client. Download all WordPress files to your local machine.
Before you start the second chapter, Import, you will need to launch a fresh WordPress instance on the new server/host. Most of the hostings nowadays offer a one-click solution for this action. Then, proceed with these steps:
- Upload files from the original website to the new server’s designated folder by using an FTP client.
- Using a database management tool, create a new database on a new server and user with the same credentials as the old one.
- Use phpMyAdmin or another tool on the new server to import the original database file (.sql) file that you exported from the original site.
- In the WordPress files that you uploaded, locate wp-config.php. Update the database details with the new server’s information.
- Use a tool like “Better Search Replace” or manually run SQL queries to update old URLs to new URLs in the database.
- Visit the Permalinks settings in the WordPress admin Dashboard and save to refresh the permalink structure.
WordPress migration with another plugin
One of the more popular migration plugins in the official WordPress directory that should present a rather simplified solution compared to manual migration is All-in-One WP Migration. Note that with this plugin, you won’t be able to tweak much, but it is designed rather as a generalized solution that should run straight. The steps go as follows:
Backup process:
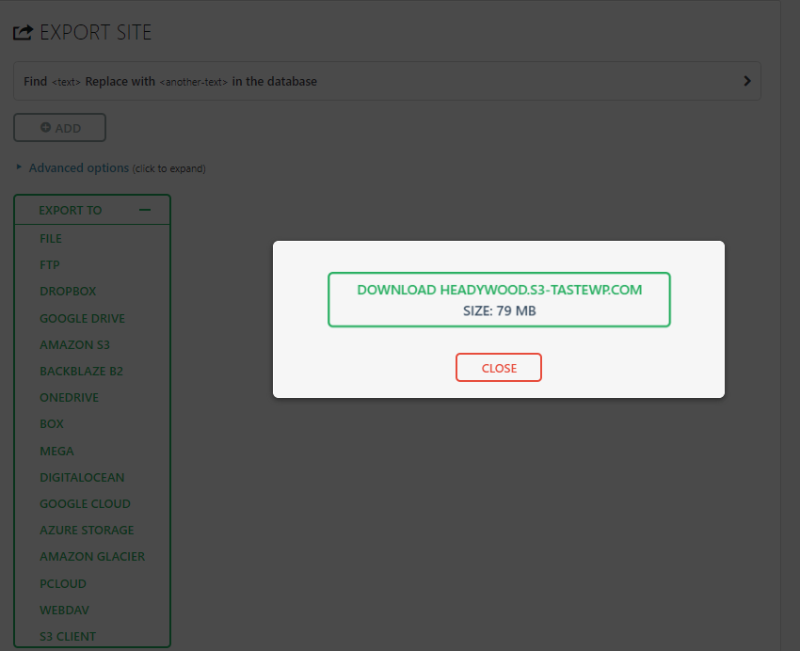
- On your old site, install the All-in-One WP Migration plugin.
- Navigate to the plugins’ section Export, click on the green “Export to” button, and select File. This will create a backup file and automatically start the download of it, to your local machine.
Migration process:
- Set up a fresh WordPress instance – your new site, and install All-in-One WP Migration on it. You will also need to manually set the maximum upload file size, to be at least as your backup file size is.
- Navigate to the plugin’s section Import, click on the green “Import from” button, and select File. Pick the backup file created in the previous chapter, and once it is uploaded, click on the Proceed button.
- Once the process is complete, click on the Finish button, and your site should be restored and operational. You just need to double-check the permalink structure, located in the Settings section of the WordPress admin dashboard.
Concluding Thoughts
In the not-so-distant past, the prospect of migrating your WordPress site often meant reaching into your pockets for paid assistance or leaning on hosting agencies to handle the heavy lifting. Or rolling up your sleeves and doing the job manually, hoping for the best (depending on your skill level).
But times have changed, and with the advent of user-friendly migration tools like the Backup Migration plugin, the power to seamlessly migrate your site is now firmly in your hands.
Say goodbye to time-consuming hassles and unnecessary expenditures, as today’s site owners can confidently take the reins, achieving secure, independent migrations that save both time and valuable resources. This remarkable plugin effortlessly simplifies the process, making it a must-have for webmasters seeking a smoother, stress-free journey.
Author Bio
Emma is the QA engineer at Inisev Ltd, the company that created the Backup Migration plugin, and many other brilliant WordPress tools, such as TasteWP, MyPopUps, and other plugins such as Copy Delete Posts and Redirection.